
PREFLIGHT INSPECTION
Before any flight the pilot is responsible for ensuring the aircraft's airworthiness for that flight. This entails an inspection of the microlight known as the preflight. The pilot should develop a routine for carrying out this visual inspection and use the same method each time. Some prefer to check specific items in sequence, i.e. engine and prop, then fuel undercarriage, controls and so on. Others may like to start at a certain point, say the nosewheel, and work their way around the whole aircraft thoroughly until they have gone right round and back to the nosewheel again.
Whatever method is used, the aim is to satisfy yourself that everything is up to standard and free from defects. An established routine helps ensure nothing is missed. Discovery of a defect means the aircraft must be grounded until repaired and inspected by the appropriate person.
A procedure for completing a preflight inspection is detailed in the RAANZ pilot logbook.
If your preflight inspection is interrupted you must start the inspection again.
Preflight should include:
- Pilot documentation: Appropriate pilots certificate, current medical, warm clothing, eye protection and helmet.
- Microlight Documentation: Registration, Flight permit, and radio licence if required.
- Propeller: Propeller integrity, security of gearbox or belts and external bearings and shafts.
- Engine: Security of spark plugs and all electrical leads, throttle movement and cable integrity, choke and ignition switch operation, check all mountings, carburettor and exhaust for cracks and security.
- Fuel: Correct mix, sufficient for flight plus reserve, filters for contamination, fuel lines for hardness and integrity fuel cock operation, check fuel drain for contamination.
- Controls: Correct and full movement, cables, pulleys, rods and hinges for excessive wear.
- Airframe: Integrity of structure, i.e. no cracks and dents in tubing, or sloppy bolt holes, or loose nuts/bolts, security of internal bracing wires, fabric not ultra violet damaged or ripped, no kinks or broken strands on wires/cables. Check locknuts, pins and locking wire security.
- Undercarriage: Security of, integrity, tyre condition and inflation.
- Instruments: Operation. Setting. Security.
- Miscellaneous: Seating and harness integrity, baggage security.
- Airstrip: Length sufficient, surface suitable, no obstacles.
- Weather: No rain, wind less than 75% stall speed, crosswind within capability of microlight pilot. Cloud amount and type base height. Weather forecast for period and route of flight.
- Map/s: Airspace, flight route, terrain, height of obstacles.
Note:
- If the machine requires fuelling, do this before the preflight check.
- Sight down tubes this makes bends or kinks more apparent.
- Using a rag to protect your fingers, run your fingers along cables checking for any kinks or broken strands. Ensure windscreen and propeller are clean.
- Watch for missing locking pins and sufficient bolt thread showing through nuts, elongation of boltholes, cracks and wear.
- Secure baggage before preflight so controls operation and freedom can be checked.
- Physically move controls and control surfaces to check for proper operation and attachment.
- Do not allow scarves to trail loose and check for loose clothing, particularly if the prop is behind. Detachable helmet peaks and visors can easily come adrift in flight.
- Do not adopt a casual approach to defects! Ensure they are reported and attended to.
GROUND HANDLING
Proper control of the microlight on the ground is important, as a large proportion of the damage to aircraft is suffered whilst taxiing or during the takeoff or landing roll. Perhaps the most important thing to remember is that the microlight is a lightweight aircraft with a relatively large wing area, meaning that any surface wind can have a powerful effect on it.
Proper handling of the microlight on the ground involves:
- Positioning your aircraft before startup to minimise the effects of propblast on other aircraft and open hanger doors behind your aircraft.
- Making sure all bystanders, pets etc are a safe distance from the aircraft before startup, then call "Clear Prop".
- Correct use of power.
- Keeping to a safe speed for the conditions.
- Correct positioning of the controls.
- Consideration for obstacle clearance and braking.
- Keeping a good lookout.
Correct use of power. To get the aircraft moving, a fairly large amount of power may be needed.
Once moving however, only a reduced amount will be required. Microlights without nose wheel steering rely on the slipstream acting on the rudder to assist directional control. Care must be taken to use sufficient power when needed to carry out the turn, but not for long enough to increase taxiing speed dangerously.
Keeping a safe speed for conditions. Special care must be taken when taxiing (in even moderate wind conditions). A brisk walking pace is acceptable in calm conditions, however a fast taxi into a head wind could bring the microlight close to liftoff airspeed, whilst control response may be insufficient to counter the effects of gusts etc. Beware of taxiing too fast downwind as braking distance increases and control response may be nil with reduced slipstream over the control surfaces (nosewheel steering microlights are generally easier to manage).
Of course fast taxiing over rough ground can do considerable damage not only to the undercarriage, but the entire airframe, as the shocks and vibrations are absorbed. Take particular care over rough ground, and if necessary shut off the engine and manhandle the microlight through the rough areas. Allow for gentle radius turns and avoid sharp turns at speed. Turning out of wind (i.e. turning left from a position with a right crosswind or turning from upwind to downwind), may require a greater turning radius as the wind on the rudder surface counters the turn. More power will probably be needed out of wind.
Correct positioning of controls. Always bear in mind the relative airflow of the wind over the whole microlight while taxiing. Depending on the type of microlight and the control system, position the controls as required to avoid the wind picking up a wing, turning the microlight or nosing over. Check with your instructor as to what is required for your aircraft. For a conventional aircraft, Fig. 1 shows the use of controls while taxiing in wind.
Approach all obstacles gently. Allow plenty of room to slow down and stop. Taxiing downwind requires more braking distance. Remember to ensure the wingtips are well clear of obstacles. Avoid taxiing close to people, buildings, vehicles, fences, trees, etc.
Keep a good lookout. Although you are still on the ground, you must maintain a SHARP LOOKOUT for other aircraft which may be taxiing, taking off or landing. If operating without a radio from a controlled airfield don't forget to watch for light signals from the tower.
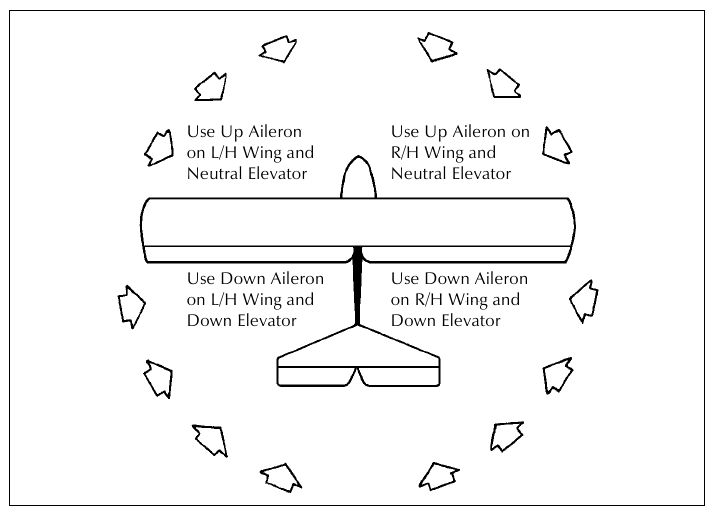
Fig. 1 Correct positioning of the controls for taxiing in wind.
PRE- TAKEOFF CHECKS
After taxiing out to the holding point, your last set of checks are the pre-takeoff checks, sometimes known as the DVAs- Drill of Vital Actions.
They are your last chance to check that you, your aircraft, and your passengers are ready for flight.
These checks should be done methodically, mindfully, and not rushed.
Many aircraft and pilots will have their own particular pre-takeoff checks, but here is a recommended general purpose checklist.
| T | TRIM | Set for takeoff | Elevator and/or rudder |
|---|---|---|---|
| THROTTLE | Idle check | Confirm engine continues to run at idle | |
| Friction set | No creep from current setting | ||
| M | MIXTURE | Full rich | |
| Choke OFF | Carburetted and 2-strokes | ||
| P | PITCH | Full fine | For in-flight adjustable and constant speed props |
| F | FUEL | Sufficient for flight | Plus reserve |
| Selector on full or BOTH tanks | |||
| Fuel pump ON, fuel pressure OK | |||
| FLAPS | Set for takeoff | ||
| I | IGNITION | Mag drop check | |
| On BOTH | |||
| INSTRUMENTS | All set and in normal range | Touch each instrument as you check | |
| H | HARNESS | Secured, unused stowed | Visually check passenger harness |
| HATCHES | Closed and secured | ||
| C | CONTROLS | Full and free movement | Visually check control surface movement |
| E | EMERGENCIES | Engine failure at takeoff action plan | Landing options |
| L | LOOKOUT | 360o traffic lookout | Particularly aircraft on final approach! |
TAKEOFF CIRCUIT AND LANDING
General
Most microlights takeoff and climb so readily that it is easy to forget that this phase of flight includes hazards associated with flying near the ground (albeit briefly) at low airspeed.
Good pilot technique includes careful consideration of the following factors which affect the performance of any microlight:
- Air Density: A lower air density will extend the takeoff roll because it decreases the performance of the engine and prop and the lift developed by the airfoil. Air is less dense when it is hot, or moist, or at higher elevation, or at lower pressure.
- Weight: The heavier the microlight the more lift is required to offset it. Therefore, the liftof speed and distance will be greater, and with a slower acceleration.
- Runway Surface: The ideal surface would be smooth and hard, such as concrete or asphalt, which allows a faster acceleration and thus a shorter takeoff roll. Tall grass, especially when wet, severely hampers acceleration. Surface water (puddles) cause a lot of drag, with the added prospect of water being thrown up, damaging the prop and causing the belts to slip.
- Runway Slope: A downhill slope allows a much faster acceleration, while an uphill slope will extend the takeoff roll alarmingly! It is generally better to takeoff downhill where possible.
- Wind: Taking off into a headwind means liftoff airspeed will be reached after a shorter ground run, and liftoff occurs at a lower groundspeed. Windspeed should not legally be greater than 75% of the microlight's stall speed.
- Obstacle Clearance: With all factors in mind, there must be no doubt that all obstacles can be easily cleared. If there is any doubt, stay on the ground until conditions improve sufficiently, or disassemble and trailer the microlight to another field. Remember, obstacle clearance includes things on the climbout path it is no use blasting out of a paddock with room to spare if you can't clear safely something else further on.
Having considered the factors of performance, there are a couple of other points which must be dealt with:
- For the wind conditions, what objects, if any, are going to be possible causes of wind shear or turbulence both during and after takeoff? (See Turbulence section.)
- Is the terrain on the climbout path suitable for a forced landing in the event of an engine failure? Where are the best areas?
- Is your initial climbout going to upset people or stock? Remember the laws about flying near people.
Takeoff
Assuming all is well with the microlight and conditions, we can taxi out toward the runway. Before taxiing onto the runway the following checks should be carried out:
- C Controls are checked for full, free and correct movement. Choke off.
- H Harness and Helmet on and secure, no unsecured objects. (Hatches closed.)
- I Ignition switches on and instruments functioning and set. For dual ignition motors check rev. drop between ignitions.
- F Fuel sufficient for flight plus reserve, turned on and checked for correct mix and contamination. Flaps (if used) set.
- T Throttle functioning correctly through full power range. Trim set, if fitted.
- A Airfield Lookout prior to moving on to the runway. Approaches clear of traffic.
The lookout on the ground is probably best achieved, where possible, by making a 360° turn to allow a more complete view of the whole area.
- Never move onto the active runway until all checks are completed.
- Always use the full length of the runway available.
- The object of the takeoff roll is to accelerate on the ground until liftoff airspeed is attained.
- Liftoff airspeed is a speed that enables the microlight to become airborne with good control response. It can be possible to achieve liftoff below the ideal speed, (with the aircraft flying in "Ground Effect") but this can put the aircraft in a vulnerable position for a few moments, as control response may be limited to counter gusts, etc. It is better to lift off at a comfortable airspeed that ensures a positive rate of climb can be established immediately. Of course, holding the microlight on the ground for too long is no good either.
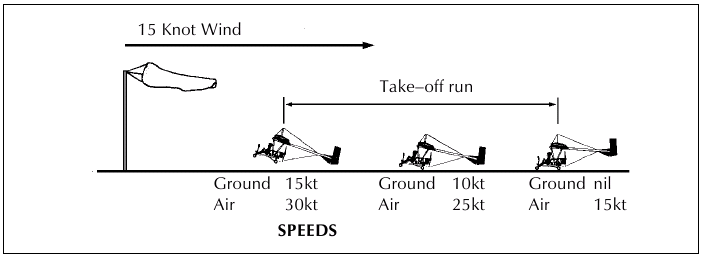
Fig. 32 The effect of a 15 knot headwind on the takeof run.
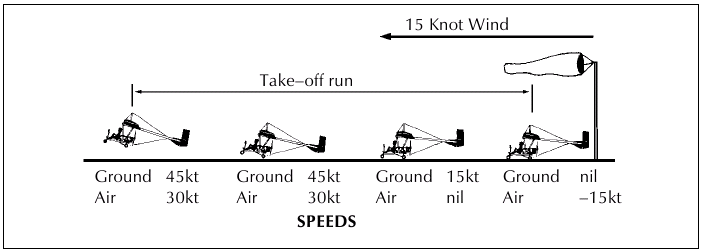
Fig. 33 A downwind takeoff in a 15 knot wind. The run is greatly increased
.
Line up on the runway and smoothly apply full power, keeping the aircraft straight.
As the airspeed increases, the controls will begin to have effect. At the appropriate airspeed we can become airborne, carefully lowering the nose if necessary, to build up to the climb speed, while in ground effect (within one wingspan height). Then the climb should begin.
It is vital that careful attention is paid to maintaining the correct climb speed. Using FULL POWER and correct recommended climb speed, ensures a safe climbout can be made to 500ft altitude.
Never haul the microlight off the ground and point it skyward at some incredible angle and expect it to get a spectacular climb. The result would be an initial zoom after liftoff, followed by a very rapid loss of airspeed and stall and, not surprisingly, there is unlikely to be sufficient height for recovery!!
Remember, use the recommended climb speeds to give the best attainable climb performance. Something else to consider is the consequence of an engine failure shortly after takeoff. With the high nose attitude and low airspeed of the climb, should the engine fail, a rather positive nosing down of the microlight will be needed to maintain safe airspeed.
If the engine failure occurred in a steep climb at low altitude, there may actually be insufficient height available to lower the nose, restore airspeed and arrest the considerable rate of descent at the flare of landing. The result could be a very heavy landing or crash. The cure is simple refrain from an initial steep climb until a safer height is reached, at least 300ft AGL. This is especially so for two place microlights, with their higher wing loadings and inertia.
During the takeoff roll make sure you are getting the full power selected, and that acceleration is normal for the conditions. Keeping a straight roll is vital.
The Circuit
The circuit is a rectangular path flown by aircraft around an airfield or runway. Generally, all turns in the circuit are made to the left for powered aircraft, unless specified right.
With all traffic adopting the circuit pattern it is very much easier to sequence aircraft for takeoff and landing because one can observe another aircraft in the circuit and predict it's subsequent likely actions.
The actual physical dimensions of the circuit may vary between pilots, machines and airfield, but there is a uniformity of traffic flow. Thus, a number of aircraft can operate, even without radio, in an orderly and safe manner. It is important, therefore, that the circuit you fly is tidy and you consider other airspace users.
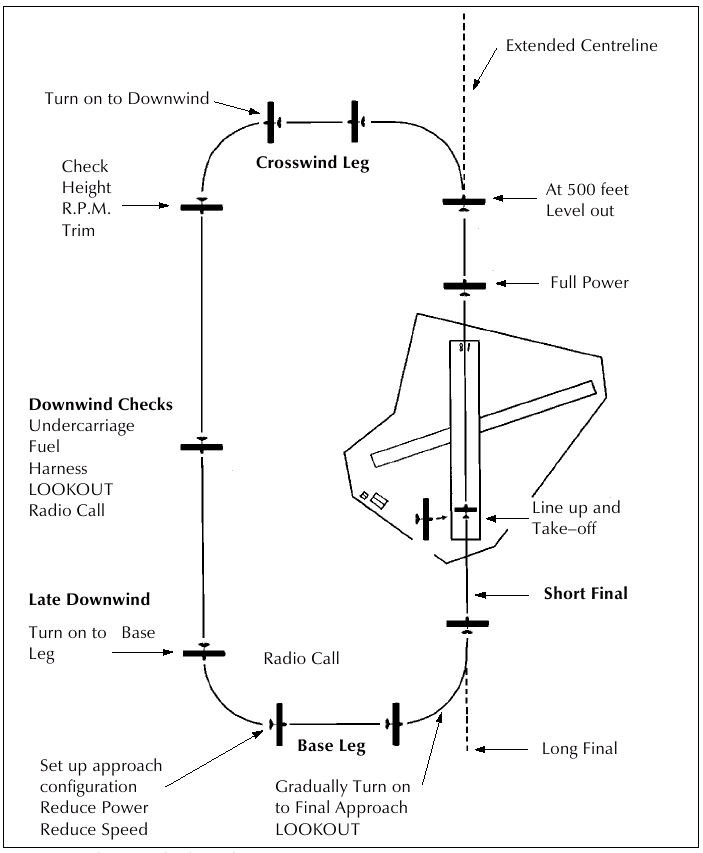
Fig. 34 The Normal Left Hand Circuit.
After takeoff, we climb under full power to the normal microlight circuit height of 500ft above ground level (AGL), taking care to maintain ground track on the extended centreline of the runway. (General Aviation aircraft circuit height is normally 1000ft AGL.)
Upon reaching 500ft we level out, looking for other traffic and turn left to a ground track 90° to the runway heading. This is the "crosswind leg" or in this case called "left crosswind" for our lefthand circuit.
From the crosswind leg we have to position ourselves on the "downwind leg" (left downwind here). Another left turn brings us parallel with the runway, downwind.
Where possible, the downwind leg should be flown within gliding distance of the runway in case of engine failure. However, not too close so as to cramp the circuit.
On the downwind leg, check height, speed and engine RPM. Also check the windsock for wind direction and strength and the airfield for obstructions.
Carry out the prelanding checks, which should include:
- Undercarriage down and locked, brakes off (if applicable).
- Fuel check quantity, sufficient for another circuit plus 20 mins reserve, selected to the appropriate tank (if applicable).
- Harness secure.
- Lookout for other traffic.
- Normally a radioequipped microlight would make a radio call mid downwind and prior to turning final.
Care must be taken not to cut in front of other traffic in the circuit, so although it would be desirable to make the next turn onto base leg, (left base), while still within gliding distance of the runway, it may be necessary to extend downwind to allow for other traffic ahead.
One more left hand turn onto "final" brings us back onto the extended centre line of the runway, into wind and ready to land.
Before discussing the final approach to landing, a few points on the circuit:
- Keep a good lookout.
- Fly a rectangular circuit, allowing for wind drift as required.
- Don't skip prelanding checks.
- Check the windsock and airfield on downwind.
- LOOKOUT.
Final Approach
A well executed approach places the microlight in the ideal position, at the ideal speed, from which to make a landing.
The approach involves controlling the rate of descent and airspeed to allow landing at a chosen position on the airfield.
Remember when setting up an approach:
- Pitch control governs the airspeed.
- Power controls rate of climb and descent.
Speed Control
The landing itself, whenever possible, involves touching down with the least possible groundspeed and at an airspeed low enough to ensure that the microlight has really quit flying once it is on the ground.
Therefore, arriving at the right height over our aiming point on the runway without excessive speed means less runway will be used in landing. By the same token, too slow an approach speed could place the microlight near the stall with poor control response and maybe insufficient pitch control left to arrest the descent.
So, obviously, each type of microlight has an ideal approach speed for normal conditions. This speed is probably something like the best climb speed.
As mentioned above, control the airspeed with elevators (pitch control). We will discuss varying the approach speed for the conditions later in the section. Speed control is important, particularly in the latter stages, where a stall near the ground could be disastrous, or too much speed could greatly increase the runway length needed.
Approach Angle
The angle of the final approach is important and is a product of the rate of descent and the airspeed, as well as the wind factor. If the approach is made from too low (shallow angle), the dangers are that of undershooting, being near the ground for longer than necessary and therefore being subjected to mechanical turbulence for longer. An engine failure on this approach would mean little or no chance of reaching the runway and an extremely limited choice of alternatives.
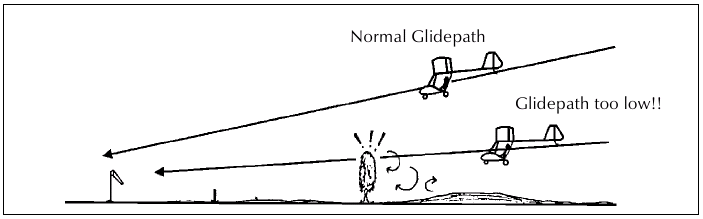
Fig. 35
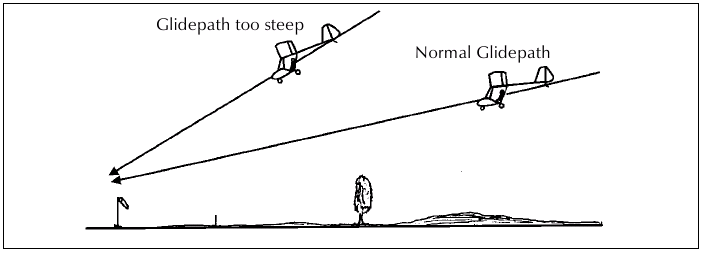
Fig. 36
This final approach angle, known as the glide path, is an imaginary line down which the final approach is flown to touchdown. It is on the extended centreline of the runway. With your instructors help you will learn the normal glidepath.
Flying down this glidepath involves:
- Maintaining the proper speed.
- Keeping to the extended centreline.
- Exercising height control to keep to the glidepath.
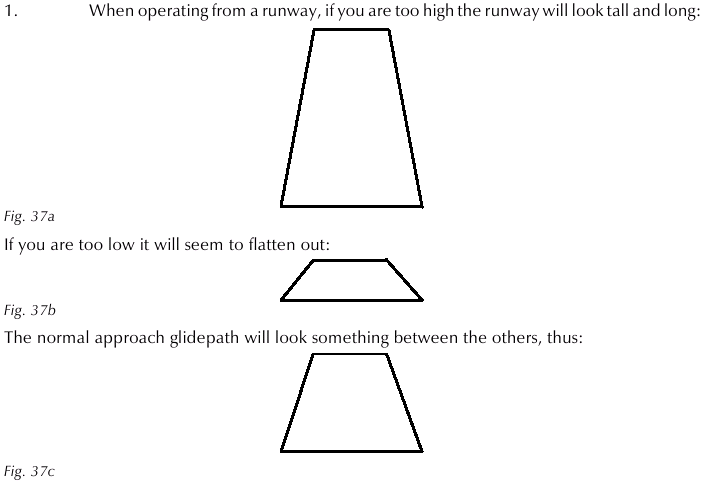
To help with judging progress down the glidepath are two visual clues commonly in use:
2. The second uses a point on the microlight to assess progress down the glidepath.
Once positioned on the glidepath, line up a point on the airframe ahead with your aiming point on the ground. If this point on the airframe starts moving up the runway during approach then you are getting too high. Conversely, if it moves back off the runway, you are becoming too low.
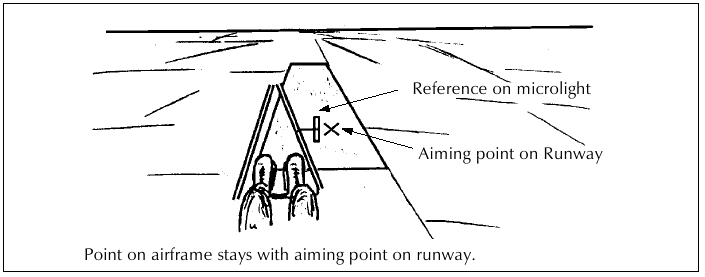
Fig. 38 On Glidepath.
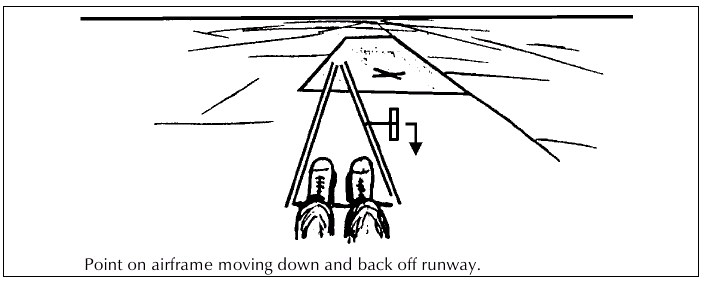
Fig. 39 Becoming too low.
If you notice you are sinking below the glidepath, power is required to retrieve the situation; apply power and raise the nose maintaining the approach speed.
When back on the glidepath, lower the nose and reduce power again as required to maintain the glidepath and correct speed.
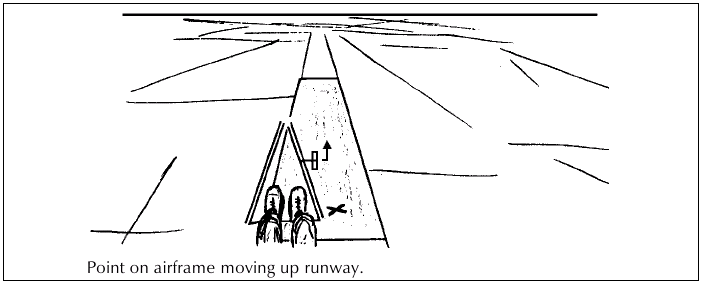
Fig. 40 Becoming too high.
In the event of becoming too high, reduce power and lower the nose to increase the descent maintaining the approach speed.
Once back on the glidepath, resume the power and speed to hold it.
Small corrections made early make things very much easier.
If the approach goes badly wrong, do not hesitate to abandon the landing, apply power and overshoot for another circuit.
Factors Affecting the Glidepath
- Wind as already mentioned, wind strength and direction. (See Flying in Wind section.)
- Areas of Lift and Sink Lift and Sink produced by convection current activity and wind flow over terrain.
- Wind Shear Discussed with lift and sink in the turbulence section.
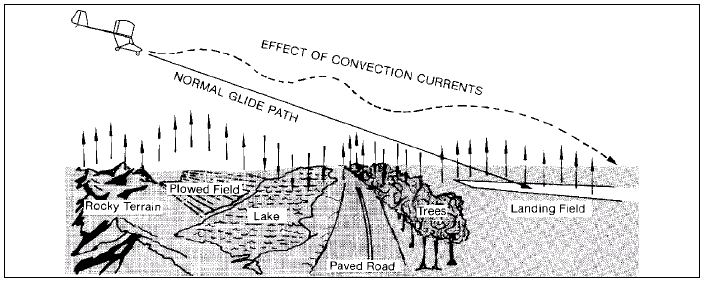
Fig. 41 Effect of Convective or Thermal turbulence.
Assuming we have flown a good approach, we are ready to land the microlight. As mentioned before, this is a matter of touching down with the least forward speed, in a gentle fashion we hope!!
Landing
During our approach we hold the right airspeed and descend at a moderate rate. During the landing sequence the following should occur. As we near the ground (often at around wingspan height) the nose is raised slightly to slow the rate of descent. This is called roundout.
When correctly timed, the roundout places the microlight a foot or two above the ground, ready for the flare. Generally, the power is off in the flare.
The aim is to achieve level flight just above the ground, progressively raising the nose to do so.
As the airspeed drops, the microlight will be unable to remain airborne, and will settle on to the runway.
Of course, during this phase of flight the microlight must be kept straight. Every landing requires special attention, especially in strong or variable winds. Be ready on the controls to counter any effects of fickle winds, remembering that at reduced speed control response wil be less.
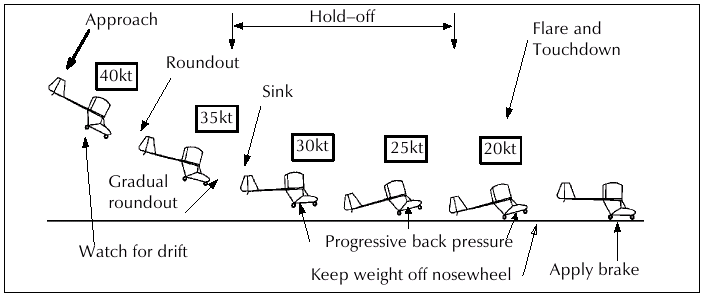
Fig. 42 Typical landing sequence for nosewheel aircraft.
After landing, wherever practical, turn off to the left. If operating from a field land to the left if possible, leaving room for al owing traffic to land on your right, anticipating your left turn after the landing roll.
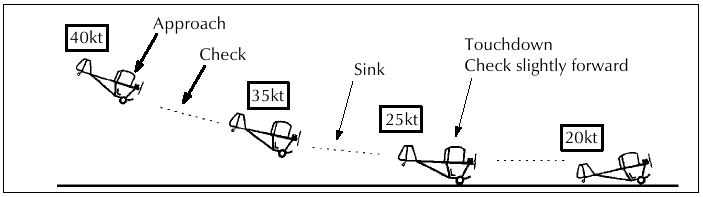
Fig. 43 Typical wheel landing (Tailwheel microlight).
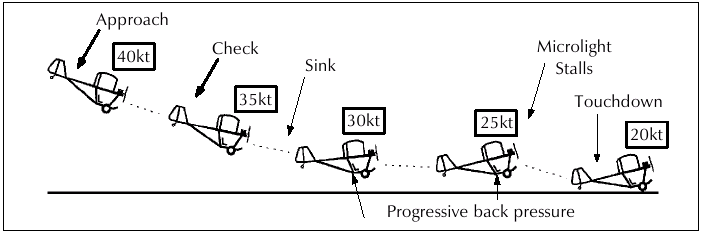
Fig. 44 Typical three point landing (Tailwheel microlight).
Notice the lower touchdown speed for the threepoint landing compared to the wheel landing.
EMERGENCY PROCEDURES
As engine failures in microlights are a constant possibility for which every pilot must be prepared, especially as the occurrence of failures to date is quite high, an immediate and correct response to engine failure is essential.
Very much in the microlights favour is the fact that most microlights glide fairly well and are capable of a safe landing in a small field. This, in addition to a skilled pilot, should give every chance of a happy outcome to what can be a traumatic experience for the ill prepared.
A simple rule which should be adhered to, is to always keep within gliding distance of a suitable emergency area and to have one in mind at all times.
Complete Power Loss
In the event of an engine failure at circuit height (500ft AGL) or below, there is inlikely to be sufficient time to remedy the engine problem without seriously distracting from the task of performing a forced landing. For this reason, an engine failure at low altitude should be considered permanent, the throttle closed and all concentration given to the landing. After all, the engine may be beyond starting again, and to attempt a restart at the expense of planning a landing is foolish. At higher altitudes, once the forced landing is planned and set up there may be time to attempt a restart.
Therefore, in the event of engine failure at low altitude or in the circuit:
- lower the nose, maintain gliding airspeed.
- check the wind direction and strength.
- choose your emergency landing field (at this height it will be practically right below or very near.
- plan your descent.
If time permits, then check:
- Fuel supply to engine.
- Choke off.
- Ignition.
"Do not mess up an approach because of an engine restart attempt!!"
Engine failure during take off roll
Unless the field you are using is very short, an engine failure before liftoff should allow room to roll to a stop before the end fence. If there looks to be insufficient distance ahead it may be best to initiate a ground loop.
Engine failure during climbout
There may be enough runway left to land ahead, otherwise make a landing further ahead. Should the failure occur further in the climb there is little or no prospect of returning to the airfield because:
- Considerable height is needed to complete the 180° turn back. In haste the pilot could easily stall the microlight. Also the groundspeed at touchdown will be higher with any tailwind component.
- Having taken off into a headwind you are better off to land ahead into wind, even on a rough surface, because the touchdown groundspeed will be lower.
Engine failure in the circuit
Where possible a circuit should be flown close enough to allow a safe glide back to the airfield from the mid downwind position, should the engine fail.
Prior to the mid downwind position, landing back on the runway into wind is unlikely, therefore the pilot must choose the best area easily reached, preferably into wind.
In a future section, we shall look at engine failures at altitude.
OVERHEAD REJOINS
When arriving at an airfield the standard circuit rejoin procedure is used to join the circuit safely.
It is used for all unattended aerodromes and may be required by Air Traffic Control at attended aerodromes, even if the microlight is equipped with radio or if you have a radio failure at a controlled airfield.
Being thoroughly familiar with the circuit procedure is important to avoid dangerous confusion in the circuit. You can ascertain from a Visual Flight Guide (VFG) the circuit procedure for registered airfields. Although lefthand circuits are normal, most airfields have a combination of left and right hand circuits operating for a variety of different reasons. Check with your instructor if you are not sure.
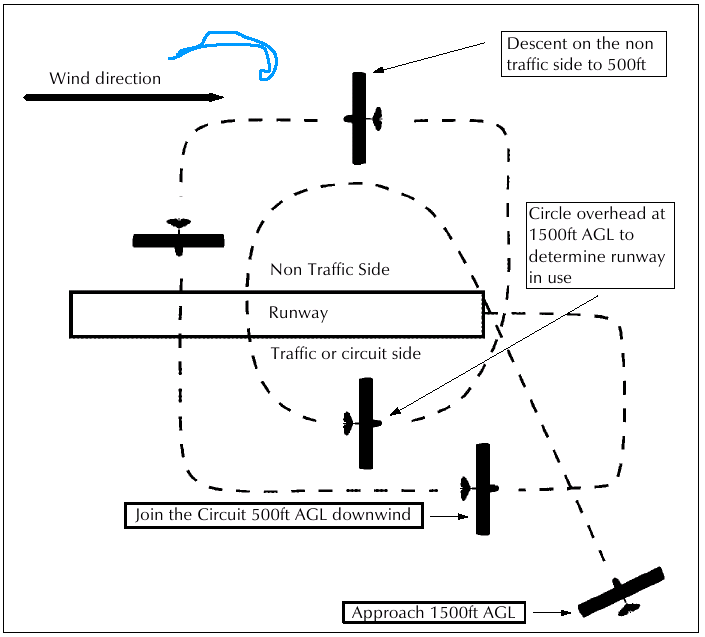
Fig. 45 Standard Overhead Rejoin.
The aerodrome should be approached 1500ft above ground level (or 500ft above circuit height).
When arriving overhead check for other traffic, then determine the wind direction and runway in use. This is done while circling overhead in a left turn, unless ground signals indicate a right hand circuit in use.
This circling turn can continue until the pilot is sure of the wind, runway to be used and other traffic. A turn or two extra to get things properly sorted out in your mind is no disgrace at all.
When sure of things, it is time to descend to the circuit height of 500ft above ground level. This descent must take place on the nontraffic side of the circuit.
The side of the runway over which the circuit is flown is known as the traffic side of the runway.
Once down at circuit height, cross the runway at a position that will allow any high performance aircraft to clear you (this may well be 2/3 or 3/4 way down the runway) and then join the circuit downwind and continue in the normal manner.
NOTE:
- A good lookout is vital when rejoining the circuit.
- Windsocks are generally located on the lefthand side of the runway threshold.
- Remember General Aviation aircraft will be flying at 1000ft AGL.
- When contacting an Air Traffic Control Unit to fly into a controlled airfield, ensure that the circuit height to be used is established, as some may prefer a 1000ft circuit be flown.
- Take into consideration the very much higher speeds flown in the circuit by larger aircraft as well as their wider circuit.
Glide Approaches
Glide approaches are taught to give the judgement needed to make an approach without power, touching down at a desired point. Usually a normal circuit is flown but at the late downwind position the power is brought back to an idle.
In order to judge the approach so as to touch down at 1/3 of the way into the airfield, we must consider the effects of:
- The microlight's airspeed on its glide angle.
- Wind.
- Wind gradient.
- Lift and sink on the glidepath.
The Speed adopted in the glide is very important. The best lift to drag ratio speed ensures the most distance is covered horizontally for the least height lost, so naturally this is the ideal speed. Gliding above or below this airspeed will reduce the glide range.
Wind As discussed in the Effect of Wind section, the stronger the headwind, the steeper the glidepath. See Figs. 46 & 47.
Wind Gradient Descending into reducing windspeed will reduce the gliding range as the nose is lowered to maintain the airspeed and as a result, the glidepath will steepen. See Fig. 48.
Lift and Sink encountered on the glidepath will alter the approach. See Fig. 41.
Aiming to land at least 1/3 into the runway helps allow for the effects of unexpected sink or deterioration of the glidepath. The judgement required for the glide approach into a smal field is considerable, but a very worthy skil to strive for. See Fig. 49.
Steep angles of bank greatly increases the stall speed and also increases the sink rate, causing a large loss of height. Avoid all steep turns near the ground.
Warm the engine periodically or as recommended. When there is medium to strong wind, do not get too far downwind of the field as glide cannot be stretched!
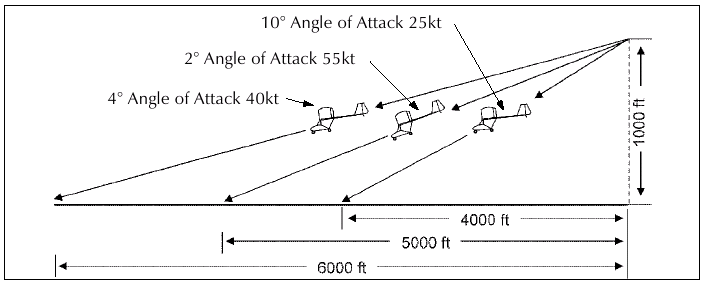
Fig. 46 The effect of airspeed on the angle of glide. At 25 kt the microlight sinks rapidly. At 55 kt height is lost in a gentle dive. 40 kt is the best L/D speed for this particular microlight.
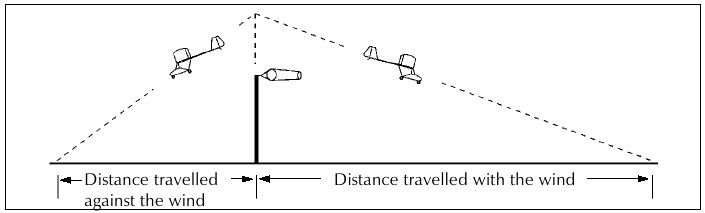
Fig. 47 Effect of wind on angle of glide relative to the ground.
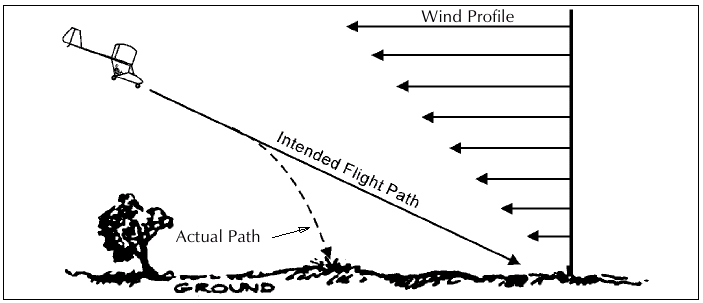
Fig. 48 Stalls due to wind gradient.
FORCED LANDING WITHOUT POWER
The pilot must bear in mind the fact that an engine failure could occur at any time, and this demands preparedness.
One of the basic safety rules already mentioned is to ensure that there is a good landing area always within easy gliding distance, even if this seems a detour must be made. Another rule is that, having plenty of height when the engine fails gives the pilot a better choice of landing field within gliding distance, and more time to plan a descent and possibly rectify the engine failure.
Flying over rugged terrain is asking for trouble! If the engine should fail, adopt the following course of action immediately which should be memorised thoroughly:
- 1 Assume the gliding attitude and airspeed and close the throttle.
- 2 Check the wind direction and strength.
- 3 Choose a suitable field for landing.
- 4 Plan descent.
- 5 Check fuel, choke and ignition.
- 6 Brief passenger.
- 7 Mayday call if applicable.
1. Assume the gliding attitude and airspeed: Once the engine has failed you are now flying a glider so lower the nose to the best glide angle airspeed.
2. Check wind direction and strength: The pilot should always have an idea of the wind direction and strength, but double check it with observation of:
- smoke or dust drift.
- wind lanes in crops or on water.
- tree movements.
- movement of cloud shadows on the ground (reflects wind strength and direction at cloudbase).
- flags or windsocks (you should be so lucky!).
3. Choose suitable field: Pick a field that is within easy gliding distance, preferably enabling you to arrive overhead with enough height for a glide approach. The field should be as long as possible, into wind to reduce touchdown speed and with good obstruction free approaches. It should also have a reasonable surface and be free from obstacles and be flat or slightly uphill.
4. Plan Descent: With the field selected, an approach has to be planned to carry out a successful landing. If there is sufficient height, plan to arrive abeam the threshold at 500ft AGL (as in glide approaches).
5. Check fuel, choke and ignition: If there is sufficient height and time, check fuel sufficient, cock turned on, choke off (mixture correct), ignition on. Check for partial power the engin may lose power but not necessarily stop, in which case any partial power may assist the landing, but should not be relied upon.
6. Brief passenger: If you are flying a two place with a passenger, he or she will be greatly reassured by your brief explanation of your intentions. Point out your intended landing field and calmly show them the location of any emergency equipment (first aid kit etc) on board. Make sure helmets and straps are secure. A little reassurance goes a long way in a situation like this.
7. Mayday Call: If radio equipped and time still permits, make the standard Mayday call .
Continue with approach. Don't forget the downwind checks and select fuel and ignition off, throttle closed on final.
Fig. 49 Forced landing into wind to touchdown in first half of field.
Remember:
- Avoid steep turns.
- If you are too high execute gentle "S" turns to lose height while approaching the field. Do not try a quick 360° turn as you will lose more height than you think.
- Stay near your chosen field and keep it in view at all times.
- Keep the landing field at an angle of 45° to you at all times, this will assist you not becoming too low.
- Try to note the distance and direction to the nearest dwellings.
- Don't let a restart attempt or Mayday call distract from approach judgement.
"Do not get airborne again until the engine problem has been correctly and carefully rectified."
Once safely down, secure the aircraft and if possible, notify the appropriate people of your whereabouts and situation.
PRECAUTIONARY LANDINGS
This is simply an unplanned landing carried out for safety reasons. There are many situations where a precautionary landing is called for. A problem with the microlight, deteriorating weather, or becoming lost are some examples. The aim of a precautionary landing is to terminate a flight safely before a dangerous situation arises or gets out of hand. No pilot should feel compelled under any circumstances to continue with a flight if safety is going to be compromised and a safe landing can be made. For whatever reason it is decided to terminate the flight, the next course of action is to select a suitable landing field.
Depending on the situation the choice of field may vary, but look for the largest, flattest, smoothest field around with good approaches into wind.
Before approaching to land at your selected field, it should be closely inspected from the air first.
Descend to 500ft and circle the field looking closely for suitable surface, slope, wind orientation, length and obstacle free approaches. Note any features upwind which might cause mechanical turbulence and look particularly carefully for wires across the field and on the approaches.
Assuming all looks well from 500ft, plan your approach and carry out an approach with an overshoot, so as to check the field and approach more closely. This should be done by flying to the right of the centreline of the landing field to inspect the lefthand side (where you intend to land). If this shows everything to be satisfactory then commence the circuit from the overshoot and land.
It takes an experienced eye to pick a good field from the air. Slope is very difficult to ascertain, particularly if the field lies in a valley where the surrounding hills give a false horizon. Also, when the sun is high in the sky, undulating paddocks can sometimes appear flat, and with a low sun they can sometimes look more rough than they really are.
Don't forget to note the distance and direction to the nearest dwelling before landing.
After landing, secure the microlight against wind and stock damage, then notify the landowner and other appropriate persons of your situation and your intentions.
As mentioned above, picking good fields from the air is not always easy, but by making a habit of observing and evaluating potential fields at every opportunity, when the day comes for a real precautionary landing, the event wil be that much easier.
CROSSWIND OPERATIONS
Microlights are very prone to being affected by a crosswind because they are very light. When taking off or landing with a wind from the side, there is a tendency to weathercock (turn into wind) as the wind acts on the rudder surface. The extent of this tendency depends on the undercarriage position relative to the centre of gravity and the centre of pressure, and the strength of the side wind component.
Also to be considered is the effect of the dihedral angle of the wings in a crosswind. Microlights with a pronounced dihedral may tend to have the upwind wing lifted as the wind gets beneath it. It is these factors which makes keeping the microlight moving in a straight line on the ground in a crosswind difficult, and requires care by the pilot. To some extent the turning moment can be counteracted by use of roll control (aileron), in applying an opposing downward force on the upwind wing by holding the controls into wind. The ability to control the microlight in a straight line is to a large extent dependent on the effectiveness of the rudder in counteracting the weathercocking tendency.
Crosswind Takeoff
Hold full roll control into wind and use the rudder to keep the microlight straight as the take off begins. As flying speed is near ease off the into wind control as effectiveness increases. A slightly higher than normal liftoff speed is desirable. The slightly higher liftoff speed assures a positive rate of climb initilly to preclude any chance of touching down again; since to touch down while crabbing to offset the drift would almost certainly damage the microlight. So once airborne, offset the drift to track straight down the runway.
Crosswind Landing
On the approach crab so as to track down the extended centre line of the runway, a slightly higher than normal approach speed may help with control of the microlight in windy conditions. When rounding out the microlight must be straightened with the rudder so as to face directly down the runway.
There are two methods of counteracting drift:
- The nose of the aircraft can be turned in the opposite direction to the drift, so that its foreaft axis is at an angle to the flight path.
- A sideslip can be made towards the wind which will cancel or balance the drift.
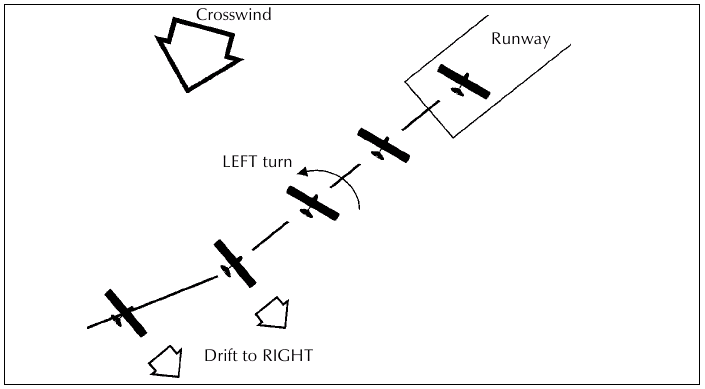
Fig. 50 Drift is counteracted by turning the nose of the aircraft towards the wind.
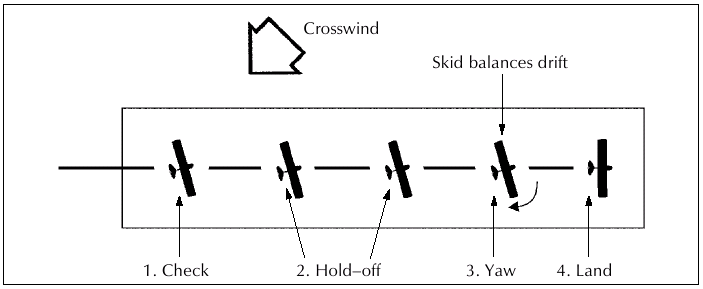
Fig. 51 The final stages of a crosswind landing (method 1). Lining up with the runway causes a skid which balances drift.
"The microlight must not be landed while travelling sideways across the ground."
If the aircraft does begin to drift sideways the upwind wing should be lowered, reventing the yaw with the rudder. The microlight is flared and lands on the upwind wheel first, and after touchdown holds full roll control into wind. It is once on the ground that the fun can really begin.
As the aircraft slows and control effectiveness reduces, the crosswind will try to weathercock it into wind, lift the upwind wing, or both. The pilot must be ready to use full controls to counter these tendencies. Each type of microlight behaves differently and can cope with varying degrees of crosswind, so consult your owner's manual and get expert advice.
Attach:tmfig052.png Fig. 52 Crosswind landing (method 2). A sideslip is used to counter drift.
SIDESLIPPING
This is a method of increasing drag which is normally used on final approach as a way to reduce height. This can be achieved by crosscontrolling the aileron and rudder, (i.e. left aileron and right rudder) and adjusted as required to maintain the centre line of the runway. The maximum effect being achieved when either, or both controls are fully deflected. Care must be taken to resume normal (balanced) flight prior to landing. In some aircraft the effect of this manoeuvre can be quite dramatic as there can be a very large increase in the rate of descent.
LOW FLYING
New Zealand Aviation Rule Part 91 states that flight should be at least 500ft AGL except when on the extended centre line of the runway taking off or landing. Therefore low flying should only occur during training or in marginal weather as an operational requirement. When at low altitude, the sensation of speed is greatly increased. Care wil have to be taken to anticipate the time and distance required for turns. This is especially so when there is any wind present. The ground track of a turn made out of wind will be much wider than a turn into wind and a climb with a tail wind will reduce the climb angle. Also a turn downwind will need an increased airspeed.
Aspects like these are mentioned in the flying in wind section, but we point them out because at low altitude their importance is magnified. Collision with an obstacle or the ground is only a miscalculation away. Grim as it may sound, it is essentially true.
Flying near the ground requires considerably more accurate flying skills than at altitude. A low altitude stall for example could be disastrous as there may be insufficient height to recover. It is possible to fly in to an area which is too restricted to turn out of or climb out of. Naturally, mechanical turbulence at low altitude will be violent and make control difficult.
When low flying, keep in mind the following:
- Maintain proper airspeed and make balanced turns at all times.
- Anticipate! Keep your thinking well ahead of the aircraft, anticipate all manoeuvres with regard to effect of wind, turbulence, room needed etc.
- Do not forget to monitor engine and fuel supply. Bear in mind that map reading will be difficult due to the smaller field of view.
- Choices of emergency landing fields will be extremely restricted should the engine stop.
- Lookout! When low flying, one's attention should be largely outside the cockpit, looking ahead carefully, anticipating what is required. Below 500ft AGL there is a real possibility of flying into a wire of some sort. The possibility of encountering other aircraft at that height is also there after all, if you have been forced to fly low by weather, then so will any other pilot in the vicinity.
Operating at low altitude requires total concentration for safety. Low flying in bad weather in unfamiliar country with turbulence while trying to map read is best avoided if at al possible!
Landing & Takingoff on Hill strips
New Zealand, because of its terrain has many sloping airfields, many of them agricultural strips.
The golden rule is to land up hill and takeoff down hill regardless of a possible downwind component (providing flying conditions are suitable). Beware of turbulence.
- Landing: When making an approach to a sloping (rising) airstrip, extra speed is required on the approach to effect a roundout, and then "fly up" the strip before the wheels touchdown. If you are landing into wind, uphill, beware of rotor turbulence.
- Takingoff: Takeoff downhill as most aircraft will be unable to outclimb the rising ground, irrespective of wind direction. Generally, the steeper the slope the greater the downwind component can be, for a downhill takeoff.
WIRE STRIKE
Because of the nature of microlight operations, where paddock landings and farm airstrip operations are common, the possibility of flying into wires is relatively high. No pilot can afford to be complacent about wirestrikes.
Firstly it must be stated that as far as the Ministry of Transport is aware there are no wires anywhere above 500ft above ground level (AGL) in NZ.
The first defence against wirestrikes therefore is to avoid unnecessarily flying below 500ft AGL. It is the takeoff and landing where a wirestrike is most likely.
Can't we see the wires? Yes, but only under ideal conditions. In fact, the odds of actually sighting the usual country power line or telephone wire from a safe distance (in flying terms) while airborne, are small. Against a plain contrasting background such as the sky, the wire is more likely to be seen.
The second defence against wirestrikes is to be aware of wires, to think wires. What is needed is an active awareness of the possibility of wires at low altitude. If the wire itself is difficult to see then the pole or pylon supporting it may be easier to spot. Electric fence wires strung across valleys and paddocks by farmers are probably the most difficult to see especially as the supporting pole may be small or even a tree or shed.
Ask the property owner and other pilots about any wires in the area and keep in mind that wires do literally appear overnight!
Inspect any prospective landing field very carefully for wires on the approach and overshoot either by visiting first on foot or with extreme care from a safe height when airborne. During the airborne reconnaissance, use circling manoeuvres as these will vary the light conditions and reflections and thus increase the chances of detecting wires or their supports. Finally make a lower level reconnaissance if possible, which may enable you to detect some wires that were not visible when viewed against the background of mother earth.
If in doubt, fly above the height of the supporting poles or pylons. Remember that there may be an earth wire running above the power wires.
Cross lines at an angle, and over, or at least near the pylons. The angled crossing gives an easy turn away if the height of the wires has been misjudged. If you can see hightension transmission lines, beware of the earth wire that is often strung above them. Again, above pylon height will keep you above trouble.
Don't attempt to "just miss" wires, but give them a wide berth. Judgement of distance can be very difficult.
If you have to takeoff or land over wires, your main defence is a thorough understanding of the performance and capabilities of both your aircraft and yourself. Microlight pilots, in particular, need this skill for outlandings.
Electric fences used by farmers for grazing control can be extremely hard to spot. While some types of wire and standards used are brightly coloured they can still be virtually invisible to the pilot until very near.
Probably the easiest indication of the possible presence of an electric fence are variations in the colour of the surface of the paddock as it is grazed down. From the air this is readily apparent, but of course, only after stock have been grazing for some time.
Beware of support wires for aerials which can be anchored quite some distance from the structure itself.
CLOUD FLYING
Illegal? You Bet!!! In flight we rely primarily on our sight to tel us which way in relation to the ground we are orientated. Take away our visual reference to the ground and even our balance sensing inner ear mechanism is of no use whatsoever.
In an aircraft with three dimensional movement, without the help of visual contact with the ground, our brain gives us completely false sensations of "which way is up" (known as vertigo).
The microlight pilot who flies into cloud is suddenly enveloped in a damp, grey, featureless environment, and visual contact with the ground is lost. In a very short time (seconds) the pilot will be misinformed by his senses as to which way is up, and will move the controls according to this false impression, leading to erratic and uncontrolled flight. This could easily lead to overstressing of the airframe.
No matter how good you think your sense of balance may be, nor how experienced a pilot you are, the reality of vertigo is that you WILL suffer from it. Even pilots of suitably equipped larger aircraft in instrument conditions sometimes feel quite sure their instruments are wrong. Their senses tell them one thing, while the instruments, functioning perfectly, tell the undisputed truth.
Don't kid yourself that your microlights' inherent stability will keep things on an even keel until you emerge from the cloud. The interior of some clouds is violently turbulent with rain, hail, airframe icing and lightening.
Sometimes, when flying in reduced visibility, such as too close to cloud base or in light fog or rain, it is possible to see quite clearly downwards, while forward vision is badly obscured. The dangers here are obvious, and pilots should remember to judge their visibility with this in mind. See Aviation Law section for microlight visibility requirements.
NIGHT FLIGHT
Night flying in microlights is also illegal of course, with obvious vertigo and navigation problems.
While no pilot hopefully would be fool enough to contemplate a night flight, there may be, on occasions, times when a flight has been badly misjudged and landing takes place near darkness.
The hours of morning and evening civil twilight are in tables in the A.I.P. planning manual. One of the problems of landing in partial darkness is that depth perception suffers, making it difficult to judge the last phase of the landing.
Remember that an overcast sky can effectively bring forward the onset of darkness quite considerably.
The hours of darkness are from after Evening Civil Twilight (ECT) to Morning Civil Twilight (MCT). These are published in the Visual Flight Guide (VFG).