
Navigation
THE COMPASS
The earth has a weak magnetic field, which culminates in two internal Magnetic Poles. These are situated near the North and South Geographic Poles (Geographic poles being on the earth's rotational axis).
The magnetic compass is a simple instrument which operates on the principal that a freely suspended magnetic needle will align itself with the earth's magnetic field, providing a datum for measuring direction on the earth's surface.
The Compass Rose
If a circle is divided into 360 equal parts and numbered clockwise from 0 to 360, then this will divide the circle into 360 degrees. Each division is one degree. Degrees are always expressed as a three�figure group, for example:
| 45 | becomes | 045 |
| 7 | becomes | 007 |
| 325 | remains | 325 |
Magnetic and True North
Although the earth's magnetic field lies roughly north and south, the earth's magnetic poles do not coincide with its geographic poles. Therefore, at most places on the earth's surface the compass needle will not point to true north pole, but to magnetic north pole.
Variation
The difference between magnetic north and true north (as represented by lines of longitude on charts) is expressed as an angle called Variation. Attach:tmfig107.png Fig. 107 Variation is called westerly if the compass needle lies to the west of true north, and easterly if the needle lies to the east of true north.
If variation is westerly, Add it to True to get Magnetic.
If variation is easterly, Subtract from True to get Magnetic.
Remember this: Variation East, Magnetic Least � Variation West , Magnetic Best.
Variation is different for different places on the earth's surface. Furthermore, local agnetic fields from mineral deposits and other conditions can distort the magnetic field causing additional errors.
Variation is shown as broken lines joining points of equal variation on your charts; these lines are called Isogonals.
Deviation
Actually, the magnetic compass is rarely influenced solely by the earth's magnetic field. Metals, electrical equipment and even your microlight's airframe can influence the compass causing additional error.
The difference between direction indicated by an undisturbed magnetic compass and that indicated by a magnetic compass in an aircraft is cal ed deviation. To eliminate this error a process known as "swinging the compass" determines the error for any heading and is shown on a card next to the compass. This tells the heading to steer to compensate for deviation.
| Magnetic Headings | Steer by Compass |
|---|---|
| North | 001 |
| North East | 045 |
| East | 091 |
| South East | 136 |
| South | 180 |
| South West | 223 |
| West | 266 |
| North West | 314 |
Fig. 108 A typical compass card.
Remember: any metal object placed near the compass may cause considerable error.
Longitude and Latitude
For the sake of convenient reference, the spherical surface of the earth is crossed with two sets of imaginary lines, called:
- Meridians of Longitude
- Parallels of Latitude
Every point on earth has a line of Longitude and Latitude running through it.
Longitude
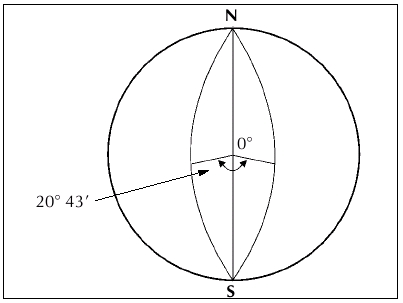
Fig. 109 Lines of longitude join the North and South Poles.
These lines are referenced through a line passing through Greenwich, London (0 � 360). At 180 from the Greenwich reference line the earth is halved and we have degrees longitude east and west. Thus 181 east becomes 179 west. The figure below shows this as it would be observed from above the north pole.
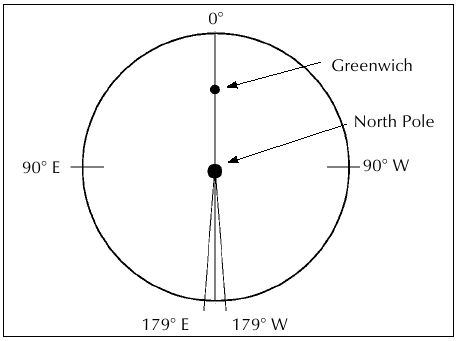
Fig. 110 Observing from above the North Pole.
The lines referenced throughout 0 (Greenwich) are usually expressed in degrees and minutes (a minute is 1/60th of a degree) and written as, say, 20� 43' west, often abbreviated to 2043 W. The distance between lines of longitude one degree apart varies from 60 nautical miles at the equator to zero at the poles.
Latitude
Lines of latitude (or parallels as they are called) are lines which circle the earth parallel to the equator (which is equidistant to the poles). Thus all lines of latitude are parallel. The equator is the reference for latitude, being known as zero latitude.
Degrees of latitude in the northern hemisphere are expressed as degrees north and degrees of latitude in the southern hemisphere as degrees south.
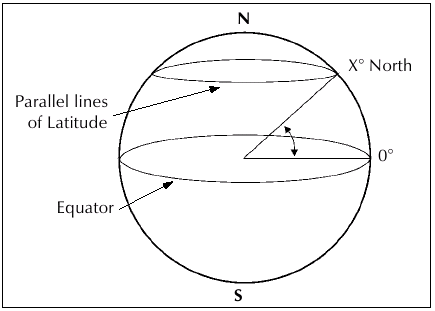
Fig. 111 It is now possible to specify any point on the earth's surface by using a line of latitude intersecting a line of longitude.
Your aeronautical chart has the lines of latitude and longitude printed on it marked in the appropriate degree. Thus for example we can find the point:
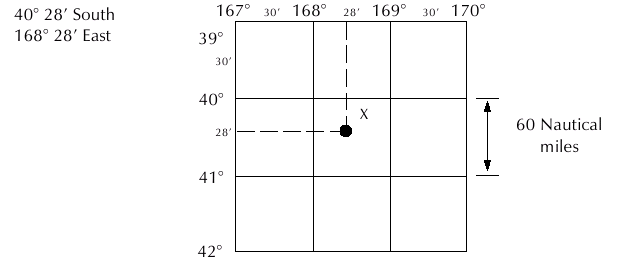
Fig. 112 When indicating a position of latitude and longitude, it is usual to give latitude first followed by longitude.
Of special note: one degree of latitude equals 60 nautical miles one minute of latitude equals 1 nautical mile on the earth's surface. Therefore, the graduations on the lines of latitude on your map may be used as a scale for measuring distance.
AERONAUTICAL CHARTS
An Aeronautical Chart differs from any road map you may use in your car in that it not only is a Topographical (showing heights and contours of the landscape) but is also overprinted with a wealth of information important to you as a pilot.
Obtain the chart covering the area you intend to fly in, from any flying establishment. It is a:
- New Zealand Topographical Map, or
- 1:500,000 scale (one unit on the map equals 500,000 on the earth's surface), or
- Aeronautical Chart.
On al cross country flights, an appropriate aeronautical chart must be carried. Check the date on the map and be sure to buy the most recently published one available as they are constantly updated.
Relief
Aside from the surface details such as roads, railways, rivers, towns etc. shown on the map, an important feature on these maps is their depiction of the type of terrain. By means of spot heights (above sea level), hill shading and layer tints, a clear impression of the landscape is possible at a glance. There are also contour lines (joining points of equal height), but these are rather faint.
It is these features which allow the pilot to visualise the land as depicted on the map whilst planning a flight or when airborne map reading.
Airspace
Aeronautical maps show controlled airspace very clearly. It is vital that you know whether or not you are flying in controlled airspace of any kind, and road maps do NOT give this information of course!
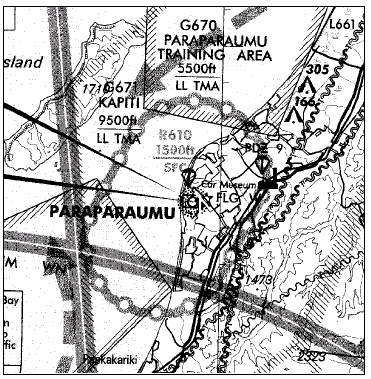
Fig. 112a
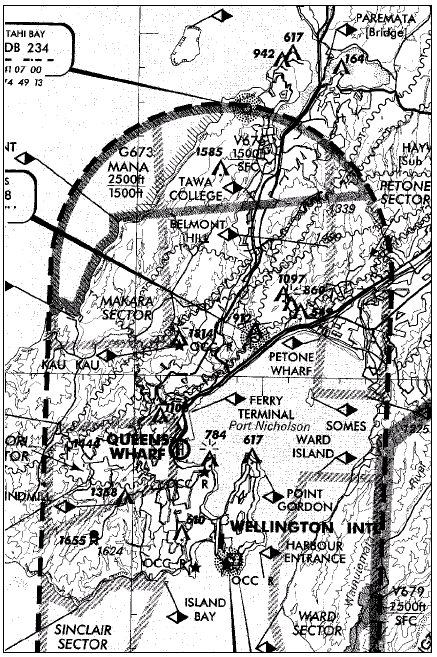
Fig. 112b
This is reason alone not to navigate with other maps.
Study your Aeronautical map very closely and become thoroughly familiar with the extent of Controlled Airspace in the area you will be flying in.
Accidental or unapproved flight into Controlled Airspace endangers yourself and others, not to mention the setting into motion of some very spectacular Airways Corporation wheels indeed! Keep clear of Danger and Restricted Areas unless you have asked an ATC unit (Air Traffic Control Tower) about operating there.
PLANNING A CROSS COUNTRY FLIGHT
While it is acknowledged that few microlights are equipped with an aircraft type compass, there is a section following showing the proper use of the magnetic compass as an important aid to microlight navigation, however the recommended navigation method is detailed in "Map Reading" on page 106.
Even pilots of microlights without aircraft type compasses should understand the method as it has an application to any cross country flight in as much as the calculation of flight times, the drift to be expected etc is concerned.
The Route
Mark the takeoff and landing points on your map. Now study the map and visualise the route. What is there along the way which may influence the flight?
The direct route may be fine, or perhaps you may need to fly around some high ground or skirt around a populous area for example. Does the route you have chosen offer safe emergency landing areas? These are some of the things to consider.
Choose the proposed route and note the prominent features which will aid map reading.
Distance
On your Aeronautical map the lines of latitude are graduated in nautical miles (these graduations are minutes of latitude). Measure the distance from takeoff along the route to your destination and note it in nautical miles.
Weather and Wind
With the help of the Meteorological service (see Meteorology section) determine the weather and wind conditions to be expected on your journey for the period of the flight. A commonly held misconception is that during an out and return journey on a reciprocal heading any headwind component will be cancelled out by the tailwind on the reciprocal leg. This is not true!!
Lets use a simple example, (to make the calculations simple we will use mph instead of knots). An aircraft is intending to fly out and return at 60mph:
- Each leg is 60 miles.
- Total time in nil wind conditions = 2 hours.
Now lets assume a 20mph tailwind on the out leg and a 20 mph headwind on the return leg:
- Groundspeed on the out leg is 60+20 = 80mph Flight time = 45 minutes.
- Groundspeed on the return leg is 60�20 = 40mph Flight time = 1 hour 30 minutes.
- Total time is now 2 hours 15 minutes.
Similar (although to a lesser extent) results can be experienced with the effects of crosswinds. A direct crosswind will stil contain a headwind component adding time to your flight.
Assuming the weather is favourable, make a note of the wind speed and direction at the altitude you will be using.
- Wind speed will be given in knots.
- Wind direction will be given in degrees true.
For the exercise to follow we shal say that we have:
- Wind � 10 knots,
- Direction � 045 true.
Note: Always bear in mind that meteorological information may differ quite markedly from actual conditions, particularly at low level. This is no reflection on the service, but rather the fickle nature of the atmosphere. In flight the pilot must develop the ability to assess the conditions for himself.
True Track
If we are to use our compass as an aid to navigation, we must make allowances for wind and direction. Start by finding the true track to your destination by measuring the degrees clockwise from True North longitudinal lines). This is called the True Track. For the exercise to follow we shall say that for example it is due east 090.
Consider the figure below. If the pilot of this machine simply follows a heading taken from the map to his destination, without compensating for the wind from his left he will never reach his goal. The wind will drift him to the right even though his compass heading remains constant.
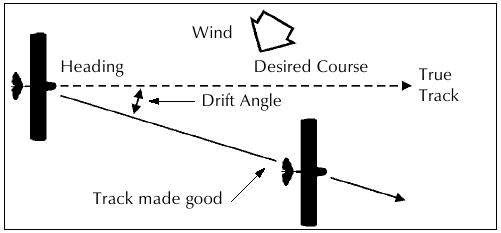
Fig. 113
The next figure shows a pilot who, with his destination in sight on the horizon, simply aims the nose of his aircraft straight at his goal. He will get to his destination, but only after a considerable detour caused by wind drifting him to the right of his desired path.
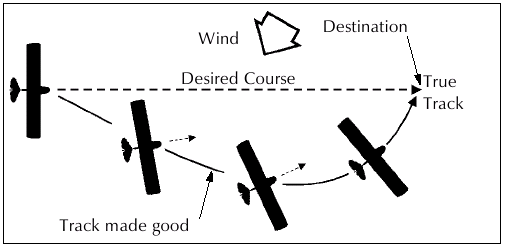
Fig. 114 The figure below shows a pilot who has visually, or by using a calculated compass heading, countered the effect of the wind drift and is making his way direct to his destination.
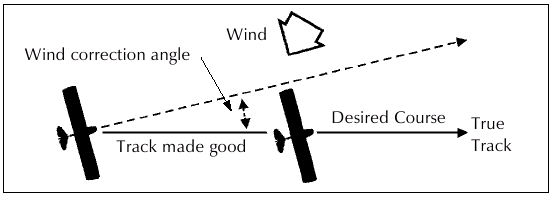
Fig. 115 How did the pilot calculate the drift and arrive at a compass heading to steer by? The method outlined below also told:
- Time the flight would take.
- Groundspeed.
- Fuel required.
The Wind Triangle
We need to know:
- Airspeed of machine.
- True Track.
- Distance.
- Wind Speed.
- Wind Direction.
We have assumed for this exercise that we have:
- True Track 090
- Distance 50 nm
- Wind Speed 10 kts
- Wind Direction 045
- Airspeed 40 kts
On a plain sheet of paper draw a vertical line representing north and south. (The various steps are shown on another page).

Fig. 116 Steps 1 & 2 & 3. Place your protractor's centre dot on the line and with the protractor orientated north and south, mark a point label ed "E" (point of departure) and make a dot at 90� (indicating true track) and another at 45� indicating wind direction.
With a ruler draw the true track line from "E" extending it somewhat beyond the dot at 90� and label ing it "TT 090�".
Next align the ruler with "E" and the dot at 45� and draw the wind arrow from "E" not towards 045 but in the direction the wind is blowing, making it ten units long to correspond with the wind velocity of 10 kts.
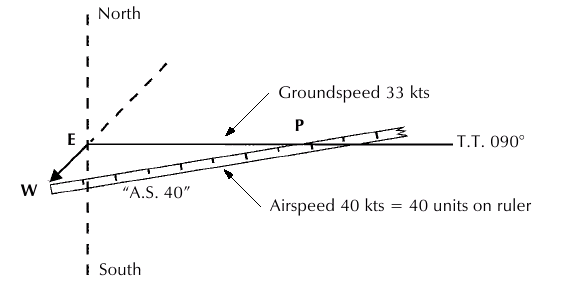
Fig. 117 Step 4.
Identify this line by placing the letter "W" at the end to show the wind direction. Finally measure 40 units on the ruler to represent the airspeed, starting from the end point of the wind line to intercept the True Track line.
Draw the line and label it "A.S. 40" (airspeed 40 kts).
The point "P" placed at the intersection represents the position of the microlight at the end of one hour. The diagram is now complete.
The distance flown in one hour (ground speed) is measured as the number of units on the true track line. (33 kts in our example.)
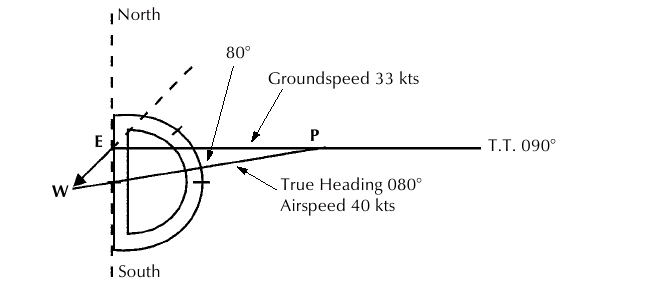
Fig. 118
The True Heading necessary to offset the drift is indicated by the direction of the airspeed line (A.S. 40) which can be determined in one of two ways.
- By placing the protractor along the north/south line, with the centre dot at the intersection of the airspeed line and north/south line, read the True Heading directly in degrees. (080 in our example.)
- Find the angle between the True Track line and the airspeed line at the intersection point "P". This is the drift angle which must be applied to the true track to obtain the True Heading.
In the example the wind correction angle is 10 degrees. If the wind blows from the right of the true track, the angle will be added, if from the left it will be subtracted. Thus, in the example given the wind is from the left, therefore subtract 10 from the true track of 090 making the True Heading 080.
After finding the True Heading, apply the correction for magnetic variation to obtain the Magnetic Heading.
With our example we shall say the variation is 19E. Therefore � 080 - � 019 gives us 06 1. The final correction is for deviation.
Your compass card wil show what heading to steer for 061 magnetic.
Flight Time and Fuel
If the distance to your destination is divided by the groundspeed you will find the time required for the flight. In our example:
- distance 50 nm
- groundspeed 33 kts
50 divided by 33 gives you 1.5 hours (or 90 minutes).
If fuel consumption is 15 litres per hour you will use 15x1.5 or about 22.5 litres.
Briefly summarised, the steps in obtaining flight information are as follows:
- True track: Direction of the line connecting two desired points, drawn on the chart
and measured clockwise in degrees from true north.
- Drift angle: Determined from wind triangle. (Added to true track if the wind is from
the right; subtracted if the wind is from the left.)
- True heading: The direction measured in degrees clockwise from true north, in which
the nose of the aircraft should point to make good the desired path over the ground.
- Variation: Obtained from the isogonal on the chart. (Added to true heading if west;
subtracted if east.)
- Magnetic heading: An intermediate step in the conversion. (Obtained by applying variation
to true heading.)
- Deviation: Obtained from the deviation card on the aircraft.
- Compass heading: The reading on the compass which will be followed to make good the desired course.
- Total Distance: Obtained by measuring the length of the true track.
- Groundspeed: Obtained by measuring the length of the true track line on the wind triangle. (Using the same scale employed for drawing the diagram.)
- Flight time: Total distance divided by ground speed.
- Fuel Required: Predetermined litres per hour at cruise speed over the flight time. Allow a few extra litres for the climb to cruise.
Note: Additional fuel should be added for safety to allow for a diversion to another landing field, unexpected stronger head winds, getting lost etc.
Returning to Base Because of changing weather, or other unforeseen events, it may sometimes be necessary to return to the point of departure. Clearly if we were to simply steer a reciprocal heading, any drift would now be acting in the opposite direction and track could be very different to what is required.
The rule to achieve a reciprocal course is:
- Bear in mind the drift being compensated for.
- Take the reciprocal heading and subtract twice this drift if it was previously from the port.
- Add twice the drift if it was previously from the starboard.
Remember after the turn the nose of the aircraft will not be pointing in the exact opposite direction to that before the turn.
Flying with a Compass
An aircraft such as a microlight does not always make a very steady platform on which to mount a compass. In turbulence the compass may swing about. Try to average this out, rather than chase the compass. Depending on the type of compass, most indicate incorrectly when being accelerated or decelerated, so read the compass during periods of stable airspeed.
Map Reading
The ability to plan a flight and set off with an accurate compass heading is very useful. However, it is important to bear in mind that without good map reading to back it up, navigating a microlight purely by following a compass heading is foolish. Should the wind change in strength or direction the compass heading is made useless, and unless you are carefully following your progress along the route marked on your map by map�reading, you would have no idea at al of any change.
The first thing you would know was that at the calculated time your destination would fail to appear! Therefore the ability to map�read is vital.
Assuming you have studied the map you wil have no trouble recognising al the symbols on it. Also, by studying the route you will be flying and the surrounding area, you will have a good idea even before takeoff of what you should expect to see.
Read from the map to the ground and then from the ground to the map.
Remember the higher you are the further you can see, but keep in mind that at more height some features become less distinct. Below 3,000ft AGL this is seldom a problem.
Do not waste time looking for indistinct features if other more easily recognisable features are around.
Always positively identify a feature once you think you have sighted it, by checking others nearby and seeing that it fits.
Mark intervals of time along the track on your map, and note whether your groundspeed is as expected. Therefore make a note of the time you get airborne in the right direction along track.
Keep reviewing your progress with regard to fuel consumption to ensure there is sufficient to complete the trip.
Navigating Without a Compass
Preparation for a cross�country flight without a compass is the same as for a flight with a compass.
The pilot should stil determine the route to be flown, airspace considerations and weather. Drawing a wind triangle will give an idea of groundspeed, time, drift, and fuel required. All this information should be gathered before the flight.
The difference now is that we do not have a compass heading to steer by, therefore we must study the map and note the prominent features along the route. These need not be actual y on the true track if they are sure to be easily seen � like a smal lake or pond, racecourse, town, open cast mine etc.
Initially what is needed is a good prominent feature just a few miles from the takeoff point, preferably visible from the takeoff point. This is likely to be a smal town, major intersection or similar, and should be on the true track.
Once airborne one can make for this feature, al owing for drift as required to keep on true track.
This first stage, which may include the climb to cruise altitude, gets the flight started on track.
From here, map reading from feature to feature along the route continues. Keep looking for the next feature to appear as you go.
However, it is vital that the first feature you make for is prominent and positively identified.
If you have mistaken this first feature and started off in the wrong direction, naturally the next features will not appear where they should. This will tel you immediately that your heading is wrong and you should still be very near your takeoff point and be able to return and look again for the correct feature while still having the option of landing.
It is a good idea as you head off from your takeoff field, to look back occasionally as you go to keep an idea of what the place would look like to return to if need be. Of course, if you have taken off from a controlled airfield then be sure you arranged for a possible return.
Use prominent features backed by smal er features. For example, if your track takes you three miles abeam a town, check that you are three miles abeam by checking a road intersection or something below.
Prominent features can easily be used to provide an approximate fix, accurate to within a couple of miles. From this position a more exact fix can be made from smal er details nearby. An example of this method is outlined below, using the simplified map shown.
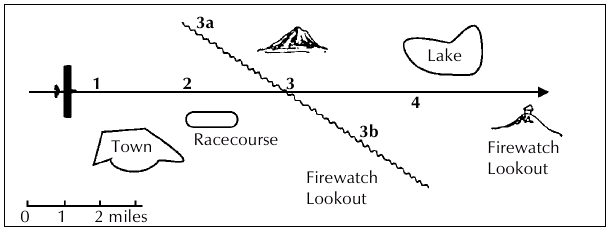
Fig. 119 Along this section of route we shal pick up from a position nearing the smal town. We know our track will take us about a mile to the left of the town, so we continue in this way. As we reach position 1 abeam the town we should have the racecourse in sight just ahead and we should see that our track will take us about a half mile left of it.
Arriving at position 2 with the racecourse on our right, we should see the high ground peak about 40 degrees to the left of track at about three miles. We may see the power pylons and their wires converging to cross our track up ahead.
At position 3 we should have crossed the pylon line when the same high ground is almost exactly 90 degrees to the left of our track. If we have crossed it when the peak was still a little ahead (3a) we can deduce that we are to the left of track; if it was a little behind us as we crossed the wires (3b) we can tell that we are to the right of track, and so on to the next features.
In this fashion we can navigate with complete accuracy provided:
- We have studied the map before flight.
- We map read carefully recording progress along the track on the map as we go.
- We always have a positively identified feature in sight and another one ahead as the next reference.
This method is really quite simple and with practice becomes second nature.
GETTING LOST
Even though you may be the most meticulous of pilots, it is quite possible that on occasion you may find yourself unsure of your whereabouts. A missed or mistaken fix, or wind change during flight can easily cause confusion.
If you have been marking your progress frequently and if you have accepted your predicament immediately without hesitation, you should be able to have at least an educated guess as to your position by projecting on your map your expected progress since your last known position.
This gives you at least a locality on your map to find recognisable features.
- If you can get back to your last known position, you can try navigating from there.
- If you are really lost, or confused, find a suitable area and land.
- Secure the machine and find out where you are, from someone.
- Do not continue blindly, wasting fuel and daylight. Land and get things sorted out.
If you think you may have entered controlled airspace accidentally, land as soon as possible. Likewise, if you become lost knowing you are in controlled airspace, land, find out where you are and advise the air traffic unit of your intentions. If you have been given a clearance, this may have to be revised.
Useful tips:
- Write down al relevant information tidily, to be easily referred to in flight.
- When following a road or railway (or any prominent feature) always keep it on the left.
- Do not continue if weather conditions or failing light gives trouble.
- Avoid causing a nuisance by flying low.
- Beware of the lee of terrain and ground obstacles.
- Beware of power wires or any other wire especial y on landing.
- Always keep an emergency landing field in range.
- Keep a close check on fuel consumption.
- File a flight plan or advise someone of your intentions and route.
- Lookout for other aircraft.
Navigation in Bad Weather
It is not at al uncommon for weather conditions to deteriorate during the course of a flight.
The pilot should constantly monitor the conditions and anticipate any problem with the weather before it becomes serious. If the trend is toward worsening weather, or you suddenly find conditions have gone bad, then you must decide the best course of action.
Depending on the situation, some of the possible options are return to point of departure, divert to another destination with better weather, or make a precautionary landing.
During any cross�country flight keep these options in mind at all times.
Some of the facets of bad weather which can be a hazard to safe flight and navigation are:
- Lowering cloudbase.
- Reduced visibility.
- Rain or hail etc.
- Increase in wind strength.
- Increase in turbulence.
It is usually true that deteriorating weather involves one or more (often all) of the above. Lowering cloudbase � has the effect of forcing one to fly lower to maintain clearance form the ceiling.
Reduced visibility � makes map reading difficult by restricting or obscuring features on the ground.
Rain or hail etc � can be very damaging to airframes, particularly propellers.
An increase in wind strength � may drastically reduce the range of a microlight or render the landing field at the destination unsafe.
An increase in turbulence � may increase the pilot workload and possibly affect the controllability or overstress the microlight.
All of these conditions are serious in themselves and demand action, but when several are present the potential for danger is greatly increased. This is due to the cumulative effect, for example, a lowering cloudbase forces our pilot to fly lower and over unfamiliar rough terrain.
Visibility becomes a problem with drizzle and wisps of low cloud, making map reading very difficult. Add to this strong wind and moderate to severe turbulence at the low level our pilot is flying, and the situation is rapidly getting out of hand.
Our pilot is now unsure of his whereabouts and the turbulence is both mentally and physically tiring. It is not long before he is completely lost. The ceiling drops further and whilst flying very low over unfamiliar ground in poor visibility, he flies into a set of high�tension wires strung across a valley.
The above scenario, grim as it may seem, is actually a fairly typical sequence of the events leading up to a weather related accident.
It is easy to say to ourselves, we would never get into that situation, which of course is the remedy to avert disaster, but it takes a certain discipline to take the appropriate action at the right time.
The right time, of course, is to take action at the first sign of trouble.
In this way, a relatively simple decision is made before any danger arises. Navigating in poor weather is ful of risks and best avoided.
Whilst on a cross country keep a constant check on:
- Your whereabouts, through careful map reading.
- Your progress with regards to fuel endurance remaining and time required to reach your destination.
- Weather conditions, not only ahead, but to each side and behind, in case of a possible diversion or return.
- Suitable landing fields in case of emergency.
- Other aircraft. Keep a constant Lookout.